Congratulations for the purchase of your new PLT-1 direct replacement module for the 1970�s LED watches made by Pulsar, Hamilton and Omega.
The original LED dot pattern display along with the plastic carrier and magnetic reed-switches are removed from the old broken / faulty corroded watch and reused with the new PLT-1 module ensuring original functionality.
Using the best of what modern technology is able to offer we have recreated all the functions of the original watch module plus more!
Four modes of operation, faithfully recreating the original functions of a one or a two button Pulsar LED watch module or Enhanced modes of operation offering additional features not available with the original Pulsar modules.
Higher precision than the original module is achieved by using a high precision Flexural Tuning Folk Quartz Crystal which is housed in a hermetically sealed heat resistant ceramic package. The module is then factory trimmed and calibrated for even greater accuracy.
The modern Ultra Fast Trench MOSFET Enhancement Mode Field Effect Transistors LED display drivers deliver a bright, crisp LED display as well as a uniform dimming function across the display segments.
Recommended Batteries to use
Recommended batteries to use with the new PLT-1 and the original modules are Genuine Swiss made Renata Silver Oxide type 357 (SR44W) 1.55 Volt Batteries, not cheap copies from far east!
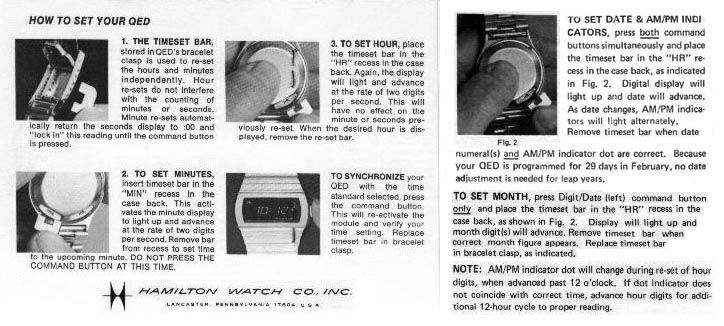
Time and Date Setting
The PLT-1 Module behaves exactly the same as the original Pulsar / Omega / Hamilton LED watch module so setting the time and date procedure is exactly the same as the original modules. Setting instructions from a original Hamilton watch is included below.
|
The Concept of Operating Modes
We have introduced the concept of operating modes with this new PLT-1 LED Watch module. The operating mode is selectable through the configuration menus and allows the module to operate with different personalities!
A single button (Time) or a dual button (Time) & (Date) operating modes fully replicates the original functions of a one or two button Pulsar watch.
As well as the two standard modes of operation we have included two enhanced modes of operation offering additional features not available with the original watch.
Using the enhanced modes of operation a single button (Time) only watch would be able to display in addition to standard Time functions, the Date, Weekday and Year!
A two button (Time) & (Date) watch would be able to display, in addition to the standard Time and Date, the Weekday and Year.
Additional Settable Features
Regardless of the mode of operation of the new PLT-1 module, additional parameters can be set through the Configuration menus to enable or disable features such as low battery warning, variable display turn off delay and display brightness adjustment.
Year of Manufacture
On module reset the year of manufacture is the default year that the module would start to count year from.
Standard one button operation
Push (Time) Button Twice and hold (Time) button after second push.
Standard two button operation
Push (Time) Button Twice and hold (Time) button after second push.
Enhanced one button operation
Push (Time) Button four times and hold (Time) button after fourth push.
Enhanced two button operation
Push (Time) Button Twice and hold (Time) button after second push.
At this point while displaying PLT one can exit the configuration menu by pressing the (Time) or the (Date) buttons.
To fully enter the Configuration menus while PLT is being displayed (Set Min) button should be activated using the magnet originally supplied with the watch.
Once fully in the Configuration, the colon separator dots would flash alternatively indicating that we are in configuration menu.
The configuration menu can be exited at any time by pushing the (Date) or (Set Hr) buttons. If no button is pressed for 45 seconds the Configuration would time out and the watch would return to normal time keeping operation.
The number to the left of the flashing colon separator is the Menu Option. The numbers to the right of the flashing colon is the Value of that Option.
On entering the Configuration the first Option is 1 and the value if not previously set 02, the display would show 1:02 This indicates Menu Option 1, which is the �Mode of Operation� and the Value 02 is �Standard Two Button Operation�.
To advance the configuration options press the time button. To set the value of the option hold the (Set Min) button using the magnet, while holding the (Set Min) button the value would cycle through until your desired value is reached, at this point the (Set Min) button should be released by removing the magnet.
Standard one button operation (TIME).
This is for owners who wish to keep their one button watch working like the original one button watch. Pushing TIME button displays Hours and Minutes & holding Time button displays Seconds same as standard modules.
Standard two button operation (TIME) & (DATE).
This is for owners who wish to keep their two button watch working like the original two button watch. Pushing TIME button displays Hours and Minutes & holding Time button displays Seconds. The DATE button displays Month, Day of the Month & AM/PM same as standard modules.
Enhanced one button operation (TIME).
This is for owners who have a one button watch and whish to have additional capability. Pushing Time button once displays Hours and Minutes, holding Time button displays Seconds. Pushing Time button again displays Month, Day of the Month & AM/PM. Pushing Time button again would display Week-Day and Year, final Time button push would again display Seconds.
Enhanced two button operation (TIME) & (DATE).
This is for owners who have a two button watch and whish to have additional capability. Pushing Time button once displays Hours and Minutes, holding Time button displays Seconds. Pushing Date button once displays Month, Day of the Month & AM/PM. Pushing Date button again would display Week-Day and Year.
The LED display by default is set to its brightest level. The brightness level can be user adjusted to any of the four preset brightness levels. Setting a lower brightness level would increase the battery life!
The LED display time out delay is set by default to 1.25 seconds. The display time out can also be user adjusted to a maximum of 3.25 seconds. Please bear in mind that extending the display time out will decrease battery life of the watch.
The low battery warning indicator by default is set to OFF, it can be turned ON to warn the user of impending battery failure. Once the low battery condition is detected the watch would warn the user by Pulsating the LED display during Time or Date functions. The battery should at this point be replaced for continued trouble free operation.
The LED display Test when enabled would test the LED display for correct functions.
After selecting 02 press the (Time) button to do the display test, after display test is completed END is displayed before returning back to the configuration menus.
Every module we manufacture will have a unique six digit serial number embedded in to the modules CPU in the form of AABBCC. The serial number can be accessed through the Configuration menus and is displayed in three lots of two digits to make up the six digit serial number.
After selecting 02 press the (Time) button to do the module reset. RST is displayed during reset then PLT before entering the time keeping mode.